DIY Chick Brooder
Last Updated on February 17, 2023 by Annie Bernauer
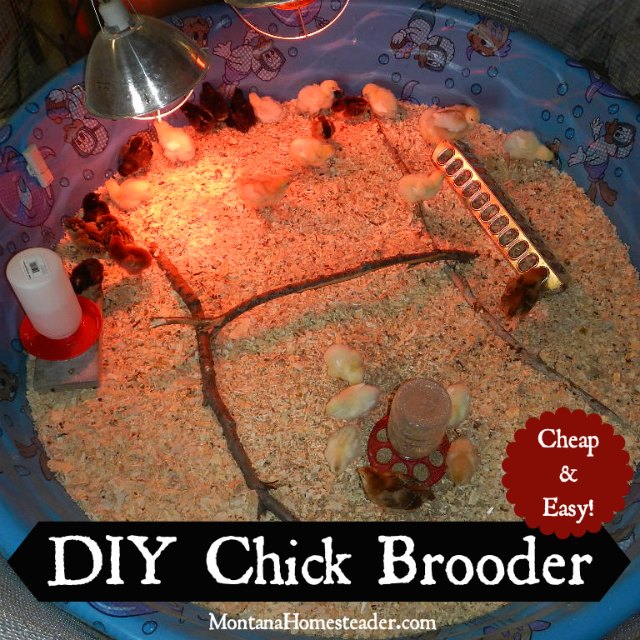
Last spring when we were getting ready to raise baby chicks for the first time, we needed a chick brooder but didn’t want to spend a lot of money on one. Montana in the spring is still pretty chilly so we knew we needed a chick brooder that our baby chickens wouldn’t outgrow in a week. We saw a lot of pictures of people making chick brooders out of plastic tubs or cardboard boxes. That definitely wouldn’t work for long since those baby chicks would run out of space quickly! We started looking around the homestead for things we could repurpose into a chick brooder. Alas we found the answer in one of the barns: Little A’s old plastic swimming pool! This cheap plastic swimming pool (only $10 at the local hardware store) got blown over in a wind storm at the end of the summer and cracked. It wouldn’t hold water anymore but it surely would make a great chick brooder!
Setting up the chick brooder
We set up the swimming pool in a corner of my husband’s shop on the concrete floor. Then we poured in wood chips and spread them out to about 1″-2″ deep. We sat a large concrete patio brick near the inside edge of the chick brooder and sat the chick waterer on top (this is the type of chick waterer base we bought since it fits any standard size narrow mouth canning jar, although it did come with a plastic quart jar too). Sitting the water up on a brick helped to keep most of the chick poop and wood chips out of the water.
We sat the chick feeder on the other side of the swimming pool chick brooder away from the heat lamp. We started out with this kind of chick feeder that fits a glass canning jar. This worked great when we had less than ten chicks. As we got more chicks and our chicks grew, they started piling on top of each other to feed. So we added a larger feeder like this one that has 24 feeding openings for the chicks to spread out and eat. 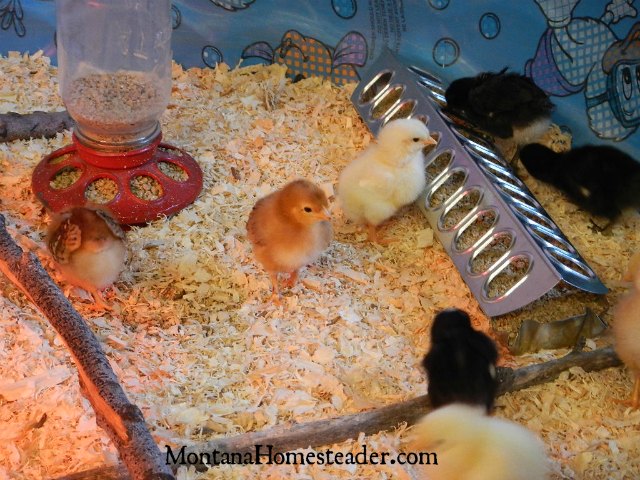
We laid a couple long sticks across the bottom of the brooder to create a low perch for the chicks.

Heating the chick brooder
We used two heat lamps like these ones to keep the chicks warm enough. We started out with one heat lamp , but then I lost all sense of self control at the feed store picking out baby chicks and we ended up with WAY more chicks than we planned (we’re talking an initial plan to get about 10 and ending up with over 30 including our meat birds!). This meant we had to add another heat lamp so there was enough heated space for all those chicks! We had read horror stories of heat lamps falling down in the wood chips and starting fires so we came up with a safe mount for the heat lamps. We had an old, sturdy wood chair in storage in the shop. We sat the chair next to the chick brooder with the back of the chair facing the swimming pool. We clamped the two heat lamps to the back of the chair and then used zip ties to make sure the heat lamps couldn’t be bumped off the chair.
To assess and regulate the heat in the chick brooder, we used one of our wireless thermometers and installed the remote sensor in the chick brooder. I poked two small holes in the side of the plastic pool, threaded a small piece of wire through and strapped the wireless thermometer to the inside edge of the pool directly under the heat lamps. We had the base unit that read the temperature sitting on a table in the shop so we could easily check the temperature and adjust it as the chicks grew and the weather changed.

Extending the height of the chick brooder
Plastic kiddie swimming pools are about a foot deep, which works great for a chick brooder when the chicks are only 1-2 weeks old. Then the chicks start getting bigger, growing wing feathers, and becoming more adventurous. Again we looked around the homestead to see what we could use to extend the height of the swimming pool. We decided to use some extra hardware cloth fencing like this that was in our metal fencing pile. We started on one side of the wood chair, clipped the hardware cloth to the chair, then walked the hardware cloth fencing around the perimeter of the swimming pool. We clipped the fencing to the other side of the chair. This created a nice tall barrier that our baby chicks couldn’t fly out of since it was three feet tall.
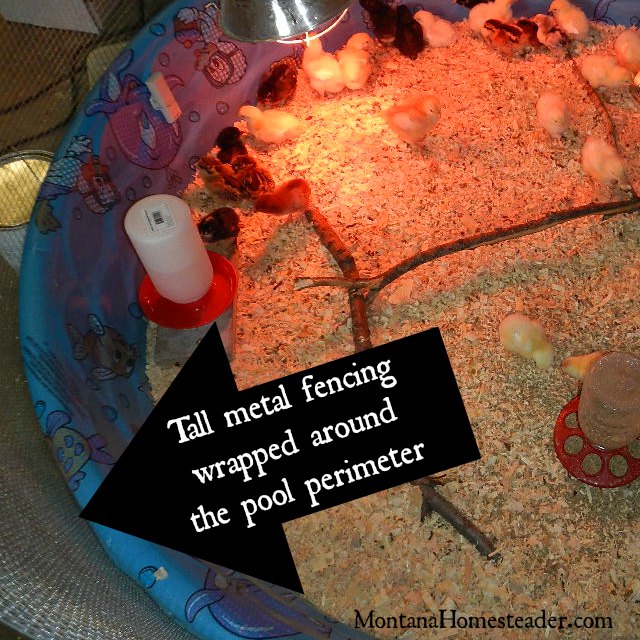
When we needed to get into the chick brooder to change water or feed them, we simply unclipped the hardware cloth on one side of the chick brooder to access the swimming pool.
We ended up having a long, cool spring last year and our chicks needed to be in the brooder longer than we planned. After a couple weeks, the meat birds were moved to a large wood brooder we bought off Craigslist for cheap. That still left over 20 baby chicks in the swimming pool brooder. We had quite the variety of chicks, some of them we didn’t know the breed since Little A got a couple Easter chicks for free at the local feed store. The chicks loved to fly about and play, which unfortunately meant that some of them (the ones we later figured out were roosters!) were flying high enough to possibly escape the 3ft tall fence around the swimming pool. We had no plans to clip the wings of our chickens since we live in the country and planned to let them free range. Instead, I took an old sheet and draped it over the top of 3/4 of the fence surrounding the swimming pool (I didn’t go completely over top since we didn’t want the sheet touching the heat lamp on one side). We clipped the sheet onto the hardware cloth fence with clothespins. This worked perfect and kept our chicks safe inside their brooder until it was warm enough to transition outside!
Cleaning the chick brooder
To clean the swimming pool chick brooder, we had to round up all those wily baby chicks and temporarily put them in a large cardboard box. I started out using a large flat shovel and scooped out the soiled bedding to dump in the compost pile. As our chicks got bigger and there was more chick poo and bedding to clean, I just opened the garage door and drug the swimming pool out to the compost pile and dumped it since it was just behind the shop.
The end results
Our swimming pool chick brooder worked great and the brooder itself cost us nothing to make. We did have to buy some basic chick supplies like feeders and waterers, but overall we were able to save quite a bit of money by making our own cheap and easy chick brooder from materials we had on the homestead. It is crazy how expensive store bought chick brooders are, like this basic wood one or this fancier heated brood box. Our DIY chick brooder also allowed us to repurpose Little A’s cracked swimming pool instead of it just being taken to the dump!
If 
What do you use for a chick brooder? Do you have any ideas to share of cheap and easy DIY chick brooders?


I live in Montana, too, and will be getting chicks this spring. I am going to try out a large Rubbermaid tub. My main question, though, is how did you overwinter your chickens? Did you need a heat lamp in the coop? Our coop will not be wired for electricity, but I’m wondering if insulation, combined with the chickens and possibly the straw compost, will do the job? Thanks for any ideas you might have…
I can think of 2 ideas of the off the top of my head.
1 Build a hardware cloth cage around the heat lamps. That way if they fly they don’t get burned.
2 Put reflectix (that two sided Mylar bubble wrap insulation) under the pool, Clipped to the fencing around the pool and replace the top sheet over the top in the same way. This will reflect the heat lamps back and forth raising the temperature inside. With temp controls it will turn off the heat lamps sooner and on later. Saving electricity. Lower heating costs.