DIY Self Watering Milk Jug
Last Updated on February 19, 2023 by Annie Bernauer
One of the biggest challenges I face with early season gardening in our greenhouse is remembering to water the plants. There’s still snow on the ground so my brain hasn’t fully shifted into garden season mode so I often find myself forgetful about watering. There’s nothing more frustrating than getting your hands into the dirt early in the season, only to have your efforts squashed when your plants die off from not being watered!
Last year we installed a drip irrigation system in our 7,000 square foot garden. Our garden plants thrived with the deep watering they received at the soil level and I wanted to be able to replicate this type of watering without using hoses or drip systems since it is still too cold out to use those.
I decided to try something new. I embarked on a DIY project to create a simple, cheap self watering system with a plastic milk jug. This idea has saved the day-and the little seedlings growing in the floor of the greenhouse!

When I was trying to come up with ideas on how to consistently water the plants in the greenhouse floor, I looked around at what types of materials we have on hand. I knew I couldn’t use a hose or drip line run from the spigot outside. It is still January in Montana with freezing temperatures that would cause the hose to freeze and crack.
I spotted a couple plastic milk jugs in the greenhouse. In the fall I would fill them up with water at the outdoor spigot, carry them to the greenhouse and water the peppers growing in the dirt floor of the greenhouse. Seeing those milk jugs sitting there was my “Aha!” moment.
How to make a self watering milk jug
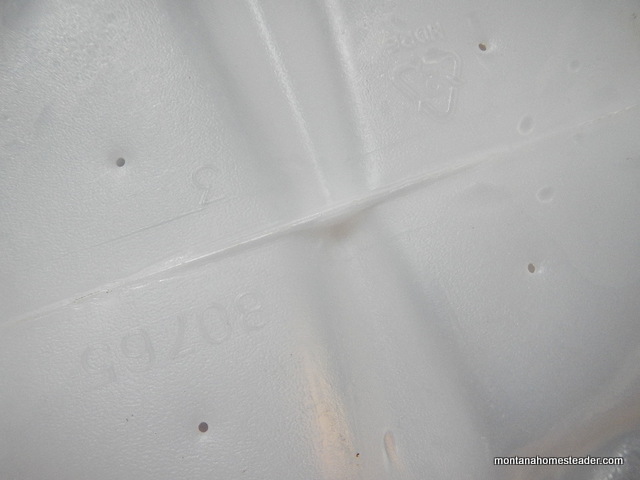
I used a sharp pointed awl like this one and poked four small holes in the bottom of the milk jug. Since the awl has a sharp point, it easily pierced the plastic without too much pressure and made a nice small hole.
The first time I tried out the self watering milk jug, I filled it up inside at the slop sink in our mudroom to gauge how the water dripped out. The water dripped slowly out the small holes. When I saw that, I knew this self watering milk jug would work great!
I filled the jug while it was sitting on the bottom of the sink so the water wouldn’t flow out easily. When it was full, I tightly capped the jug, flipped it upside down so the water wouldn’t drip out and walked it out to the greenhouse.
Using a self watering milk jug
I situated the self watering milk jug in between the two rows of garlic I recently planted. I found a couple garlic cloves sprouting in our cupboard so figured I might as well plant them since the temps in the greenhouse are warm enough during the day that the ground isn’t frozen.
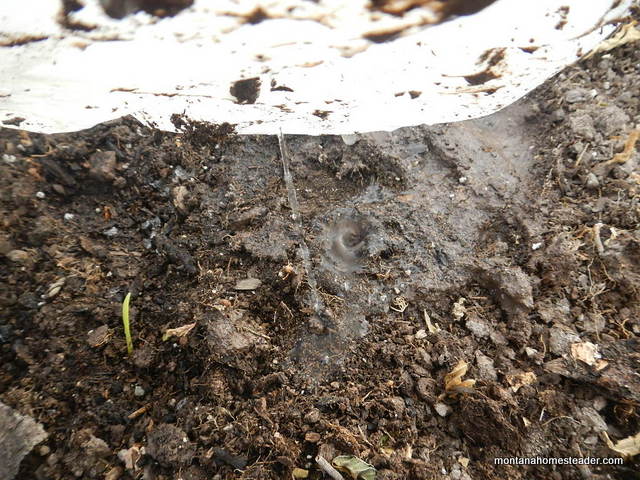
The water slowly started to drip out the bottom of the self watering milk jug. In a few hours the water was all gone from the jug and there was a large wet circle in the soil around the milk jug where the water had seeped.
I want to encourage deep root growth in the garlic so I don’t want the plants to be watered all day, everyday. Instead, using this self watering system with the milk jugs the garlic can get a good, deep soak every few days.
As I plant more plants in the dirt floor of the greenhouse, I just need to add another self watering milk jug. Every couple days I go out to the greenhouse and take along a couple other plastic milk jugs without holes that I filled with water in the mudroom. I pour the water into the self watering milk jugs and let them slowly drip the water out into the soil.
Making a homemade self watering milk jug is an easy DIY project that can be completed in just a few minutes. I love how great these work and plan to use them in other areas of our property.
I don’t plan to use them in our garden since it does get quite windy out here and I could easily see them blowing away once all the water dripped out. I think they will work great in our other flower and herb gardens when I plant transplants that need consistent deep watering until their roots are established.
After I created a self watering milk jug, I went online to see if anyone else had done this before. I saw that I’m definitely not the first to do this simple DIY project.
I read about one person who actually dug a big hole, poked the holes in the sides of the milk jug instead of the bottom and buried the milk jug up to the neck in the actual garden soil. This would solve the issue of them blowing away or looking like an eye sore in your garden!
Do you have any cheap and easy self watering ideas to share?


Great idea! I’ve tried out the “Milk Jug Mini Greenhouse” last year. I cut off the bottoms (save the cap). In my prepared garden bed I made a milk jug impression in the soil and dug out a trench that I would anchor the jug into. Planted the seed, watered it well and set the milk jug and back filled it. I poked a hole in the cap and inserted a bamboo stake into it shoving it all the way into the ground and screwed it to the jug. This keeps the wind from blowing off the jug. If your worried about having more air circulation you can cross ventilate with a few more holes in the jug. I also sprinkled Diatomaceous Earth on the outside of the jug to keep the bad guys out.
Good suggestion. Please post some pictures
your sentence structure is so questionable.
But the milk jug structure is impeccable, soooooo….
But you can fully understand it. So, um, no offense but shut the f*** up David “Small”
I began using water bottles to help plants get started and keep the wind and dog tails from breaking the tender plants. Simply cut the top and bottom off of those wasteful little bottles, put the “sleeve” over the little plant and push down into moistened soil about half way. you can water the plant more directly that way too. So far it seems to be working…word of caution, do not let it get too wet or mildew or mold will start to form because of the added heat buildup in the sleeve.
I wondered if there was a concern about the plastic leaching any of its chemical properties into the dirt and thus into the roots of the plants.
There is an ancient system called Olla that are clay pots that are placed in the dirt and they slows leach water on an as needed basis for the roots.
Are you familiar with Ollas?
I dug some holes in my flower beds and set the pots (6-10″) that the flowers come in with the holes in the bottom. I filled the pots with water for my flowers using these pots for a deep soak. It worked well.
Used a method I saw on a pinterest post. For cucumbers and squash in late summer when drought is possible.. When planting seed, planted pot first, then planted seed around pot. When the weather got warm and water rationing was necessary I could fill the pot at the point of directly watering at root level. Once a week was enough to keep plants growing and producing without watering the whole garden.
If you’re worried about the jugs blowing away, drop in some gravel, small stones, or marbles.