How to make homemade fermented sauerkraut
Last Updated on March 17, 2023 by Annie Bernauer
Learn how to make homemade fermented sauerkraut with garden fresh cabbage. It’s so easy to make and so much more delicious than store bought sauerkraut! My German husband loves his ‘kraut so every year we ferment big batches of homemade sauerkraut.
Sauerkraut is the first fermented food I ever learned how to make eight years ago and in my opinion one of the easiest ferments to make.
I like to think of sauerkraut as the “gateway ferment” that gets people started with fermenting and leads them to experiment with more homemade fermented foods. Fermenting food is an old tradition that has been revived and it is so much fun! 
Learning about how to make homemade fermented foods
The first time I ever made sauerkraut, I had no clue about the process of fermenting, the health benefits or the multitude of foods that can be fermented.
I was looking through one of my favorite cookbooks and came across a simple recipe for homemade sauerkraut.
I had some extra cabbage and thought it would be fun to try making some to eat with our family’s traditional New Year’s day good luck meal of pork and sauerkraut.
That first batch was one quart canning jar full of homemade sauerkraut. It turned out so delicious!
That spawned my interest in fermented foods which led to more learning and experimenting with foods like homemade apple cider vinegar, kimchi, ginger ale, fermented carrot sticks, a variety of fermented herbal sodas and our current favorite fermented “crock pickles” that my great grandmother used to make.
One of my favorite books about fermenting is Wild Fermentation. This book explains practically everything you ever wanted to know about fermenting and more.
It is full of a wide variety of fermented food recipes and a definite must-have in every fermenter’s kitchen!
Do I need a fermentation kit, special fermenting lids or can I use a crock or mason jar?
I am a simple, frugal homesteader at heart so I prefer to use basic tools found in my kitchen to make ferments.
Granted if someone were to gift me a set of these fermenting lids I would happily put them to use! But they are not something required to ferment at home.
I use glass jars and crocks I find second hand to make sauerkraut. These are all vessels that I use for other purposes in my kitchen so I don’t have to spend extra money to make my ferments.
I have gallon size jars I’ve used for years to make sun tea and half gallon size glass canning jars that are my go-to fermenting vessels.
They hold a lot of food and since they are clear glass it is fun to be able to watch the fermenting process going on inside the jar.
How to make homemade fermented sauerkraut
Every batch of homemade fermented sauerkraut I’ve ever made never resembles the brown slimy sauerkraut that comes out of a can from the the grocery store.
Instead our homemade sauerkraut has a more appealing color, texture and delicious mild flavor like what you’d find in a jar of raw sauerkraut in the cooler section at the grocery store.
This basic recipe makes about one quart of sauerkraut out of a medium to large size head of cabbage.
If you have more cabbage and want to make a larger batch (which I often do), adjust the recipe accordingly.
How long does it take to ferment sauerkraut?
It takes about 7-10 days to make homemade fermented sauerkraut depending on how warm it is.
It ferments a little faster in the warmer summer months but takes a day or two longer if I make a batch on my counter top in winter with a cabbage from our cold storage.
You can always continue to let it ferment longer than that. The longer it sits and ferments, the more tart the flavor!
Ingredients to make sauerkraut:
1 medium to large size head of cabbage
4 teaspoons of salt
Directions to make sauerkraut:
- Step 1: Wash the cabbage and remove any brown or damaged leaves. Core the cabbage.
- Step 2: Shred the cabbage into thin slivers. I use my beloved food processor and quickly shred the cabbage in a matter of seconds.
- Step 3: Place the shredded cabbage in a large bowl. Sprinkle with the 4 teaspoons of salt.
- Step 4: Massage the salt into the cabbage shreds with your hands or use a wood sauerkraut pounder. Someone gifted us a lovely handmade ‘kraut pounder a few years ago which I absolutely love since it really does make it easier!(here’s a similar beautiful handmade one on Etsy.) The cabbage should start producing a juicy brine.
- Step 5: Pack the sauerkraut into your preferred fermenting vessel that has been sterilized/cleaned well. Press the cabbage down in the jar/crock to pack it in tight. The brine should come up at least a half inch above the cabbage. If you don’t have enough brine, mix a separate batch of brine to pour over top (extra brine= 2 teaspoons of salt mixed in 2 cups of water)
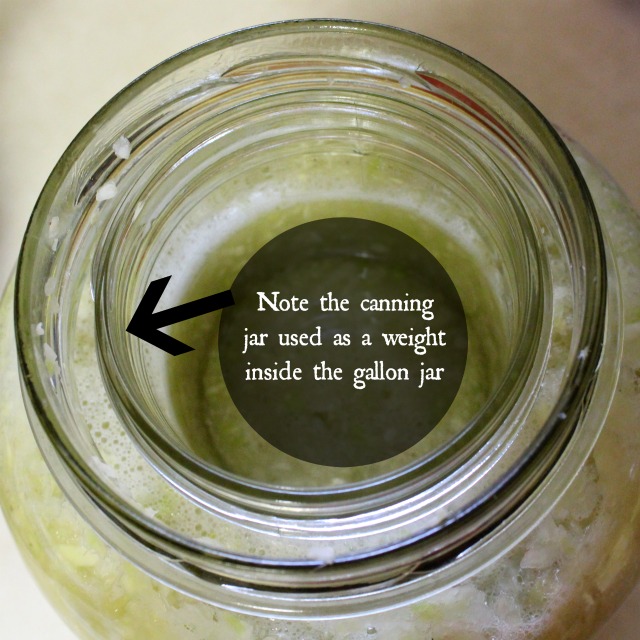
- Step 6: Weight the sauerkraut down so it remains under the brine level to ferment. I’ve used a variety of weights over the years including a scrubbed and boiled rock, a plate, a bowl, a canning jar, and a plastic lid fit down inside a jar.
- Step 7: Cover the jar or crock to keep out fruit flies and dust but do not cover tightly so the gasses released during fermentation can escape. I’ve used a canning jar lid sat on the jar but not tightened or just put a piece of cheese cloth over the jar opening with a rubber-band around to hold it snug. This year in addition to my glass jars, I used a new-to-me second hand crock with a lid that sits on top which is similar to how my great grandmothers made sauerkraut years ago.
- Step 8: Sit the sauerkraut in a cool spot out of direct sunlight. I tuck mine back into a corner of the kitchen counter so we can keep an eye on them and watch the fermenting process. I always sit mine on top of a folded up kitchen towel to help absorb any brine that runs out.
- Step 9: Let the sauerkraut ferment. After a day or two, you should start to see small bubbles rising up inside the sauerkraut. The brine level will start to rise up and may overflow the vessel. This is fine and normal! You should start to smell the tart scent of sauerkraut after a few days.
- Step 10: After 7-10 days of fermenting, the brine level drops down and we know it is ready to eat. You can continue to let the sauerkraut ferment for as long as you would like. The longer it ferments, the more sour it will be. You can put the sauerkraut vessel in the refrigerator which will slow down the fermenting process- just be aware it will make your fridge smell like ‘kraut!
Homemade Sauerkraut Tips
- Clean your hands, sauerkraut equipment and vessels well and continue to keep the vessels clean while fermenting. There’s nothing worse than putting in all the effort to make a homemade ferment and having it start to grow mold. I’ve learned that lesson the hard way! No little hands dipping into the sauerkraut crock or little hands double dipping a fork for a fresh bite of sauerkraut.
- I’ve made sauerkraut with fresh cabbage and cabbage that has been in cool storage for several months. Both work for making sauerkraut, but I’ve found that fresh sauerkraut produces more of it’s own juicy brine since the moisture content is higher.
- I’ve made sauerkraut with green cabbage and I’ve made it with purple cabbage. Both will ferment but have slightly different flavors just like the cabbages themselves have slightly different flavors.
- I always err on the side of less salt and have never had a batch of sauerkraut turn out too salty. I’ve heard several people say that they failed at making sauerkraut because it was too salty to eat.
- If your sauerkraut turns out too salty for your liking, rinse the sauerkraut under water after it is done fermenting and before you eat it. This can help reduce a salty flavor.
- I occasionally add grated carrots into some of my homemade sauerkraut to ferment along with the cabbage. It gives the sauerkraut more color, flavor and nutrients and our family loves it. I’ve also added in shredded onion which gives it more zip and flavor.
- You can add in other spices other than salt. I’ve heard of adding caraway and fennel to sauerkraut but since I don’t like the flavor of those spices I’ve never used it.
- Sometimes if I have a ton of cabbage and make a lot of sauerkraut, we don’t have space to keep all of it fermenting on the counter or in the fridge. We freeze sauerkraut in 32 oz freezer containers and thaw it out later whenever we want to use it.
Ways to use homemade fermented sauerkraut
I grew up in Pennsylvania where the tradition is to eat pork and sauerkraut on New Year’s Day for good luck in the coming year.
Our family continues this tradition to this day, although we also enjoy pork and sauerkraut other times during the year.
We like to cook a pork roast covered in sauerkraut in the slow cooker or roasted in a dutch oven. We serve it with a side of mashed potatoes.
A quick and easy version we make is to cook bratwurst covered in sauerkraut in a cast iron pan on the stove top and serve it with a side of mashed potatoes.
I also enjoy eating a small bowl of raw fermented sauerkraut as a snack or side dish with a meal.
Have you learned how to make homemade sauerkraut? What are your favorite ways to eat sauerkraut?
updated March 2023