How to ripen green tomatoes 5 different ways
Last Updated on September 25, 2014 by Annie Bernauer
This time of year when the first frost is headed our way, one of the biggest questions for gardeners is how to ripen green tomatoes indoors. When living in an area with a short growing season, many of us end up with tomato plants hanging full of green tomatoes when the first deep frost of the season arrives. Figuring out how to ripen green tomatoes will help you have delicious homegrown ripe red tomatoes well into the fall. I’ve even heard of some folks having their green tomatoes ripen all the way up to Thanksgiving!

In years past, our gardens were small enough that I only had room for about ten tomato plants. They were easy to cover with old bed sheets and blankets when the first light frost hit. Once the heavy frost hit, we would have a pound or two of green tomatoes to harvest. I always laid them on a piece of newspaper on the side of the kitchen table or counter to ripen.
This year we have over 60 tomato plants in our 7000 square foot garden. When our first light frost came last week, it took us well over an hour to cover everything with old sheets, blankets and we even had to pull some of our good sheets from the house to get everything covered! (Next year we’ll be more prepared by buying a big roll of this stuff!)
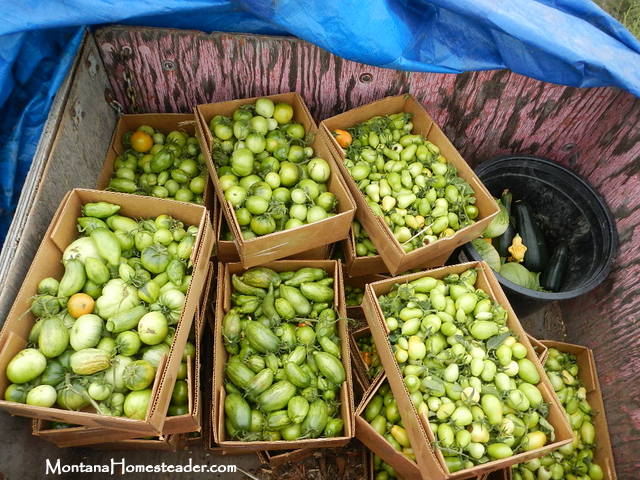
When the deep frost of 26 degrees was predicted for this week, we knew we would have to harvest all our green tomatoes. Every single tomato plant was loaded down with beautiful green tomatoes. It took me three hours to harvest them all! We’ve never had this many green tomatoes to store and ripen so we faced a dilemma this year. How were we going to ripen this many green tomatoes?
For starters, here are the basics of ripening green tomatoes:
- Green tomatoes ripen the best at temperatures between 55-70 degrees Fahrenheit.
- The best area to ripen green tomatoes is where it is warm but not in direct sunlight since that will dry them out.
- Green tomatoes will ripen quickly in about a week when kept in an area around 70 degrees.
- When stored at cooler temperatures in the 50’s, the tomatoes may take up to a month or more to ripen.
- Green tomatoes ripen the best when you leave a small part of the stem on.
- Only mature green tomatoes will ripen indoors. You can tell mature fruit by the shiny color of the skin. Small tomatoes with a non-shiny matte type skin will typically not ripen indoors.
Knowing the basics of ripening green tomatoes still had us scratching our heads on exactly what to do. How can we get over 200 pounds of green tomatoes to ripen? Where in the world should we put 200 pounds of green tomatoes while they ripen?!
We asked some fellow homesteaders for advice on how to ripen green tomatoes and got some great ideas to help us figure out what we were going to do.
5 ways to ripen green tomatoes from fellow homesteaders:
- Jess from The 104 Homestead suggests “Wrap them individually in newspaper, place them in a box and store in a cool dry place. They’ll be ripened in 2-4 weeks. A word of caution: check them daily because if there was a nick in the skin it could cause the tomato to rot.”
- Kathie from Homespun Seasonal Living also harvested a couple hundred pounds of tomatoes and recommends “ I just put them in cardboard boxes and leave them sit in the guest room. They ripen slowly over time. Go through the boxes every few days to look for any that might be getting bad and pull out the ripe ones. Have done it for years that way.”
- Jenna from The Flip Flop Barnyard suggests “I set them out on the deck rail in the sun if it’s still warm weather. When I pull the last ones before frost I put them in the window seals.”
- Andrea from Little Big Harvest recommends “ I use paper grocery bags and add an apple or a banana to the bag before rolling up the top. The apple or banana (both seem to work equally well) release a gas called ethylene that helps ripen the tomatoes. I usually fill the bags only half to three-quarters full to prevent too much squishing, and then sort through them every other day or so to make sure none are rotting.”
- Teri from Homestead Honey suggests “We ripen green tomatoes by laying them in a single layer and covering with sheets of newspaper. Check the tomatoes every few days for ripeness!”
How we’re ripening our green tomatoes:
So what did we end up doing? The day before I harvested all the green tomatoes, some friends brought over a huge stack of store bought boxes that were left at their house by the previous owner. They knew we have a busy Etsy shop and are always shipping things so could put them to good use. The large size boxes were too deep for just one layer of green tomatoes so my husband cut them all in half before they were assembled. Then we taped the sides together to form cardboard flats about three inches deep. These made the perfect size box to store a single layer of green tomatoes and the boxes were easy to stack.
I took these boxes out to the garden with me and as I filled them up, I put them in the back of the four wheeler wagon. Once they were all full, my husband drove the wagon into the shop for the night so they were protected from frost.
The next day I sorted through the tomatoes and pulled out any that had marks or spots on them that would potentially cause rot and ruin the rest of the tomatoes. These tomatoes we turned into homemade green tomato salsa verde (recipe coming soon!)
The rest of the tomato filled cardboard flats were stacked in our mud room since the shop would be too cool for them to ripen since we don’t heat it every day. Every couple days I sort through the flats and pull out any tomatoes that are ripe. My hope is that the majority of them ripen all at the same time so we can make and can one big batch of homemade tomato sauce!
How do you ripen green tomatoes?
This post shared on: The Homestead Barn Hop, The Backyard Farming Connection Hop, The HomeAcre Hop,


We had a light frost last night. It seems the tomatoes did alright. I think today I will need to start the process of bringing them in. It’s getting awfully chilly here in Maine.
I am anxious for the recipe for the green tomato salsa verde recipe! I live in Montana as well and need to take care of my green tomatoes soon. 🙂
I’m hoping to get the green tomato salsa recipe posted in the next week or so, it is SO busy around here with harvesting and canning that it takes me a little longer to get things up on the blog!
Thank you for all the tips here! I will find myself doing this in a few weeks.
Can’t wait to see your green tomato salsa recipe…yum! You sure did get a huge haul of tomatoes…I hope they ripen nicely for you!
I remember one year when I was young, my parents pulled the tomato plants up, roots and all, and hung them upside down from nails in the walls of our basement. We had tomatoes ripening nearly all winter!
I heard about this method and we considered trying it but didn’t. The issue for us was that about half of our tomato plants were romas and for some reason they would fall off the vine with the slightest touch. By the time we would have uprooted the plant, there probably wouldn’t have been any tomatoes left on the vine!
This is great advice for ripening green tomatoes! Each year we usually can our green tomatoes as green tomato chutney. It’s fantastic with anything that has curry or turmeric in it, both of which I use often to make sauteed greens or soups. Also delicious by the spoonful or over bread 😉
Yum, what a great idea! I might try making some since we have SO many green tomatoes this year!
We wrap unripe tomatoes in newspaper and store them in a kitchen cupboard
.Seems to work ok. Some ready in a few days. Some a little to longer.
HI there, what varieties have you grown? The paste look so big, and wonderful!
We grew several varieties of tomatoes this year. My favorite of them all were the striped roman tomatoes. They look like large, robust romas but have these beautiful stripes on them. We also grew regular romas, Oregon Spring, and Opalka.
In Italy, my grandmothers cut the plant at its base and hung them upside down in the store room.
The tomatoes would last for a few months and ripen beautifully with so much flavour.
Sue, can you tell me more about this method. I grow San Marzanos and while in Italy I have seen this. They hang the plant upside down and it just seems to sun rippen. Any help would be appreciated… Thanks
What a great way to make tomato season last just a bit longer.
I just pulled all my plants and have my greenies ripening on the counter. I don’t have too many, though, as I invited friends over for a fried green tomato feast and also made a few batches of pickled green tomatoes!
What a fun idea to have a fried green tomato feast! Pickled green tomatoes sound pretty tasty too, we might have to try that!
4″ long nails, 3′ apart, 10′ above barn floor. Pull up entire plant, hang upside down by root ball, harvest most of winter. Barn rarely, if ever, freezes, lots of free animal heat!
Great idea and I love that the animals keep it warm enough that the tomatoes won’t freeze!
The easiest way I’ve found to ripen green tomatoes after it gets too cold is to yank up the entire plant with all tomatoes still on the vine, then tie the individual plants into bunches by the root ends. You can easily bunch 2-4 plants together. Then, hang the whole mess in the garage or barn. This is probably also the laziest way to get beautiful perfectly ripened tomatoes after frost. Remember to have them hanging upside down with the root ends toward the ceiling. Then all you have to do is pick them as they ripen. Once all tomatoes are picked from the bunches, just put the whole vine into the compost pile.
I put mine in one layer on the kitchen counter, and they ripen slowly. I usually use them in soups or pasta sauce…
A botany professor I spoke with said to jam a shovel into the ground right beside the tomato plant a few weeks before the first frost. The plant responds by ripening up the tomatoes more quickly in an effort to complete the fruit before it dies.
This post makes me feel so lucky to live in western Oregon where we don’t usually get frost until sometime between late October and mid November! Sorry to all of you colder climate folks who only get about three months to do tomatoes!
We simply hang half of our plants to slow ripen in our coolest building through summer and we ripen the rest on the windowsills in our living quarters so that they are in sunlight after 2, and ripen the most in the shade, in the heat of the day. This seems to be the case for Supersonics and Pink Brandywine’s.
I leave them in the garden until the first week of Oct. but I do have to cover them some nights.. The longer you can leave them to absorb as much sunshine as possible the better. When I harvest them, I pull the whole plant up hang them up in the basement where it is dark and cool. I often am still eating ripe tomatoes until Dec. If too many ripen at one time, I blanch and then freeze them. I also dry them in the fruit dryer and make my own “sun dried” tomatoes.
Down here in the midlands of South Carolina we will get a killing frost sometime in late October or so, but by then I’ve already collected all the tomato’s that are going to fruit, so I let the hen’s in to clean up the ground and have at anything I’m not taking. I read through all the reply’s looking for what we do with the green tomato’s and finally found my answer about 3/4 of the way down the page. Fried Green Tomato’s! Growing up I was the child who would gag whenever my father dished out the salad and insured that I got at least a few tomato’s, so I never really cared for them. As I got older, I have found that I can eat them (I will eat them in a box, I will eat them with a fox…). However, the very best way to eat a green tomato is to fry it up. Quickly, this is how we do it down south. Slice off the tops and bottoms (chickens love them), Make your remaining slices approximately 1/4 – 3/8″ thick. Mix up a coating in a gallon zip-lock bag with the following. I don’t do exact measurements, that’s no fun. About a half cup of regular flour, about a cup of cornmeal (white or yellow, it doesn’t matter), About a third or so of a cup of corn starch (this is important. It will give you a really nice crispy crust). A good dose of salt and pepper each (maybe around a tablespoon each). That will give you a good coating base, and will make a fried green tomato reminiscent of what the old grandma’s would make. However, I do like to kick a few other ingredients in just for personal taste. A couple shakes of Mrs. Dash, some seasoned salt (or I found a real good soul food seasoning), and a shake or two of cayenne pepper. This gives it just a little bit extra bite. If you don’t like the extra bite, leave the cayenne out. You can then dredge the tomato slices through some milk, buttermilk, or a milk/egg bath if you like. I’ve done both and found each has it’s own merits. Put about a dozen or less into the zip lock bag with the dry ingredients, zip it shut, and shake it all around (You do the hokey pokey and you turn yourself around….), sorry. Anyhow, make sure that the slices don’t stick together as they are being shook up. I use a 4 inch sided copper pan with about an inch or so of oil in the bottom heated up to around 350 degrees. Don’t go much higher than that, you’ll burn the flour and cornmeal by the time you get to your last batch and it doesn’t do the flavor much good. So drop them into the oil, it’ll roll around a bit while they are cooking. Use a tongs or slotted spoon to flip them over and let them cook until they are brown. Not tan, not black. A nice light brown is what you are looking for. Have a pan nearby with a couple layers of paper towels in the bottom. Put your cooked tomato’s in there, hit them with a sprinkling of salt, and cover them with another couple layers of paper towels and a dish towel on top to hold in the heat. They will stay hot for a good while that way. Let your oil get back up to temperature and go at it again. Put a pile on your plate next to the corn on the cob and some good pork BBQ, and go at ’em. Enjoy. We sure do.
Don, Thank you for your entertaining story (I’m sure family is saying don’t encourage him) on how to make fried green tomatoes. I grew up in western Washington and have never tried. Must try with at least one of my green tomatoes
Thank you for sharing how you make friend green tomatoes, I remember my great grandma talking about making these but it wasn’t something I grew up eating.We’ll have to give it a try!