Saving Heirloom Seeds
Last Updated on January 26, 2016 by Annie Bernauer
Saving heirloom seeds is a new obsession for me. Instead of buying new packets of seeds each year, my goal is to be able to raise heirloom plants so we can save seeds to plant our garden the following year. Up until a few years ago, I had no idea that I couldn’t save all vegetable seeds to regrow them. Several times I dried and saved tomato and pepper seeds only to have the seeds never germinate. At the time I chalked it up to some mishap on my part: maybe I didn’t water them enough, maybe the soil wasn’t good enough, maybe there wasn’t enough light. Then I learned the difference between an heirloom and hybrid seed and my seed saving techniques drastically changed.

A couple years ago, I was gifted a handful of heirloom squash seeds from a fellow gardener. It may sound silly, but I felt honored to be given these seeds. I felt a deep desire to continue nurturing this line of squash to feed my family for many years to come. I recently pulled out our last homegrown squash to cook up for dinner and remembered I had yet to save any of the seeds. While it dumped snow outside, I stood in our kitchen and scooped out squash seeds to save and plant in our garden this spring.
Saving Heirloom Seeds
Saving heirloom seeds is fairly easy. For me the hardest part is remembering to do it. Last summer I left bean pods on the vine to fully mature in hopes of harvesting them for seed saving. The problem was I forgot to harvest them and they ended up in the compost pile with the vines!
When selecting heirloom vegetable seeds to save, there are a few things to keep in mind.
- Make sure the plant is an heirloom and not a hybrid. Seed packets typically will say “Heirloom” on them.
- Only harvest seeds from a healthy, strong, plant. Keep in mind you are saving seeds to propagate the next generation of plants so you want the heartiest plants’ seeds.
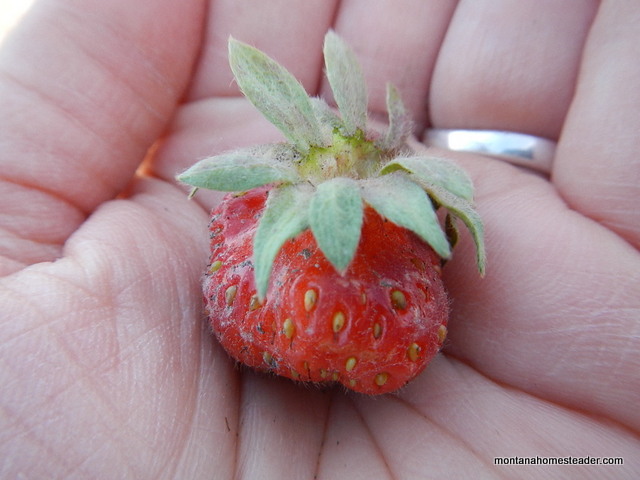
- Harvest seeds once they are fully mature. I wait until my tomatoes are nice and ripe to slice open and dry out the seeds. Here’s a picture of a mature squash seed (on the left) and immature seed (on the right). Interestingly enough, these seeds both came from the same squash. The immature seeds I ended up roasting and eating for a snack so they did not go to waste!

Once your seeds are selected, they will need to be dried out. This ensures that there is no moisture on them that will cause them to mold or rot over winter. My seed drying technique is quite simple. I lay the seeds on a cotton cloth and sit them in a windowsill. I’ve also used small wire cooling racks to lay bean seeds on so the air can circulate underneath.

Once the seeds are dry, they need to be stored in a cool, dry spot. I organize my seeds in small glass jars or plastic baggies that seal closed. These all are stored in a cardboard box on a low shelf in the pantry. I store root vegetables in there so I know that it is the ideal space for long term, cool temperature storage.
When gardening season rolls around, we’ll be ready to plant our garden with the seeds we saved! Our seed stash for this year’s garden are not all heirloom seeds we saved. I did have to buy some seed packets, but I made sure the ones I did buy are heirlooms so we can save seeds for next year. I’m looking forward to the day when we will have nothing but our own homegrown and dried heirloom seeds to plant in our gardens!


We live in an apartment right now but when I have a house in the future I would love to save heirloom seeds for future gardens.
Some of the first seeds I started saving were from tomatoes I grew in small pots on our deck when we didn’t have a larger garden space!
great tips! I plant mostly heirloom, but have never saved the seeds before! going to try this this summer! thanks!
I hope you give it a try too Heather, it is so nice when I remember to save seeds and don’t have to spend money and buy new seeds each spring!
This is such a great idea especially because purchasing new seeds every year really adds up. Thanks for the tips. Hopefully some day I can do this too!!
I agree, it always amazes how quickly the cost of new seed packets add up each year!
We have a ton of seeds saved, but nowhere to plant them right now. My grandpa has been saving seeds forever too and always has a beautiful garden.
I love that your grandpa saves seeds! That would be so wonderful to be able to plant seeds that were passed down from an older relative.
I finally saved some seed this year! My favorite heirloom tomatoes, and my uncle’s sunflowers and marigolds that he has been growing for years. I hope to have good luck growing them, and I want to save more types of seed each growing season.
That’s wonderful you saved seeds this year, especially knowing you can continue growing some family heirloom plants!
I have not tried saving seeds, but I would be interested to try. I am glad for your tips.
Hopefully you can give it a try this year!
Last year was my first year doing this. I saved some heirloom ahi dolce seeds. I can’t wait to see what they do this year!!! Thank you for this post!
That’s so exciting, there really is something so amazing about planting heirloom seeds you saved yourself!
I typically plant heirloom seeds and have just begun the very preliminary steps of saving seeds. My plan was to save seeds last year but ‘life’ had other plans for me. I’ve now got seeds germinating in my indoor greenhouse and will renew my focus this year on harvesting from the most robust plants and saving the seeds. – thanks for sharing! (visiting from The Homesteaders Hop)
~Taylor-Made Ranch~
Wolfe City, Texas
That’s exciting you already have seeds going in your greenhouse! Hopefully this year you will be able to save some seeds to plant next year 🙂
How can you tell if the seeds are dry enough?
I always let the seeds lay out for a good while so I’m sure they’re dried and won’t rot or mold when I put them in storage until planting time. For example, the squash seeds I pictured in this post were out drying for a little over a week. When I dry tomato or tomatillo seeds, I end up having some of the flesh of the fruit attached to the seed since it is too tedious to remove it all. Those ones are easier to see when they are fully dry by seeing that the flesh of the fruit is all dried and hard. With bean or pea seeds, I wait until the seed is hard and no moisture left which you can test by trying to squeeze it between your thumb and finger. If it is squishy at all, you need to let it dry longer. Hope this helps!
I tried saving some pumpkin seeds last year. I dried them on paper towels on a cooling rack. They seemed plenty dry after 4 or 5 days. I sealed them in a ziplock, but after several week that developed a blackish tint and seemed to mold.
Does that happen when the seed don’t dry enough?
Have you had any seed saving failures?
That’s surprising that after 4-5 days the seeds weren’t dried out enough and ended up molding. I haven’t had any issues with molding yet. Probably because I have a tendency to put my seeds out to dry and forget about them for a few weeks before putting them away in storage! My biggest seed saving failures are forgetting to harvest the dry bean and pea pods from the vine before composting them at the end of the season….
Great info! Thanks for sharing on The HomeAcre Hop! Hope you have time to share again today!
Thanks for stopping by Lisa! The HomeAcre Hop is one of our favorites each week so we’ll definitely be stopping by again 🙂
I have heard that storing seeds in airtight containers, such as ziplock bags, is a bad idea… seeds need air even when they are dormant. Don’t know if that is true, but you may want to look into it to make sure you don’t suffocate all your hard work. That may be why they store seeds in paper instead of plastic bags om the stores.
Also, as Christina found, if there is any residual moisture on the seeds, if you store them in plastic sealed bags they will mold. If she had stored them in paper the littel bt of moisture that was left probably would have escaped through paper and they would have been fine. I am looking forward to working with heirloom seeds this year as well. Good luck!
That’s a great tip about not using the plastic baggies! I probably never have had an issue with it since the bags I use have been reused over and over in our kitchen. They always end up with a few little holes here and there which probably helps them to breathe. I love the idea of storing them in paper though and would like to get more organized as i save more and more seeds. I’m going to keep my eye out for some small paper envelopes at the store so in the fall I can start storing seeds in those. it will be so nice to label and organize them in little paper envelopes than a bunch of random baggies and jars!
We try to save all our seeds from our heirloom plants for the next year. I think it helps them to adjust to the area they are planted, so the next year’s crop will be stronger and more protective.
That’s a great point about the seeds adjusting to the area and growing a stronger crop the next year!
We’re actually growing our heirloom tomatillo plants from our own saved seeds for the third year now so I’m going to pay more attention to the plants and produce to see if I notice a difference from when we grew them the first year. I’d like to think they’re more acclimated to our climate and producing more so it will be a little experiment to see if I notice any changes!
Love your site. I have been saving seeds for a few years and have a couple of tips that I’d like to share. There are a couple of places I get heirloom seeds that also have wonderful seed saving supplies like the little paper envelopes at reasonable prices. Seed Savers Exchange and Baker Creek Heirloom Seeds are both wonderful resources. I also purchased a book this year that has instructions on how to save hundreds of different seeds. It is called “Seed to Seed” by Suzanne Ashworth, and it is well worth buying. For instance, I learned that by fermenting my cucumber seeds before drying them out, they will be viable for up to 10 years. Same with tomato seeds. So I hope this helps. Thanks for sharing! :o)
thank you for the tips on places to buy and the book. I am going to be completely new at this gardening. well, almost new, I helped in the garden when I lived at home with my parents, many years ago. Now I am going to have my own small home and my own very small garden. (we are renting and have limited space). I am so excited!